
Kindorf channel is an incredibly versatile product used in a variety of applications from retail displays to industrial equipment mounts. With the right Kindorf channel setup, you can create secure and customizable structures to suit your needs. But with so many options, sizes, and accessories available, knowing what to look for when buying Kindorf can be confusing. This comprehensive Kindorf buying guide will walk you through everything you need to know to select the ideal Kindorf channel components for your project.
What is Kindorf Channel Used For?
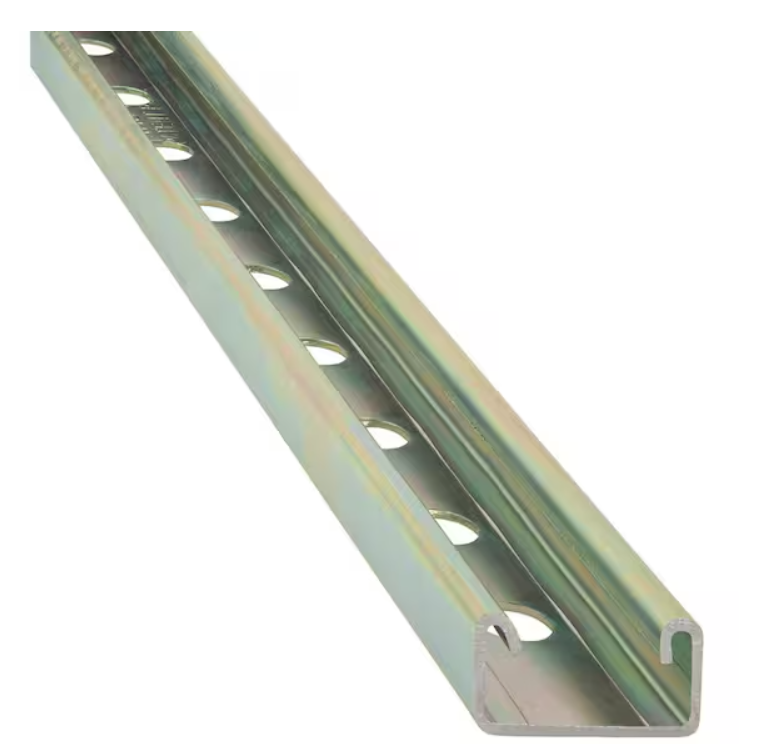
Kindorf channel, also referred to as slotted channel, is used to mount equipment, hang signs, run electrical wiring, and construct shelving systems. The channel features a slot that runs along the length, allowing brackets, hooks, and other accessories to slide in and lock in place. This makes Kindorf an adjustable and modular framing solution.
Kindorf is commonly used for:
- Retail displays and stands – From peg hooks to shelves, Kindorf provides a sturdy base for displaying retail products. The slotted design allows displays to be reconfigured as needed.
- Industrial equipment mounting – The channel is securely mounted to walls or ceilings to hang lights, conveyors, pneumatic tubes, and other industrial components.
- Trade show booths – Temporary walls, product displays, and light fixtures can all be constructed using Kindorf as the underlying frame.
- Garage organization – Bicycle hooks, storage shelves, and workbenches can be built using Kindorf as a modular foundation.
- Cable management – Electrical wires and cables can be routed through Kindorf to keep them organized and out of the way.
- Sign hanging – Signs, banners, and advertising displays can be suspended from ceilings and walls using Kindorf.
With its durability, flexibility, and capacity to hold substantial weight, Kindorf is an ideal product for commercial and industrial uses where adjustable mounting solutions are needed.
Where to Buy Kindorf Channel
There are several options when looking to purchase Kindorf channel, brackets, and accessories:
- Online industrial suppliers – Many websites like Grainger, McMaster-Carr, and GlobalIndustrial sell Kindorf channel and related components. This provides convenient access to comparedimensions and pricing.
- Hardware stores – Some home improvement stores like Home Depot and Lowes carry select sizes of Kindorf channel along with matching hardware in stores. Selection is often limited compared to industrial suppliers.
- Specialty ergonomic product vendors – Companies that supply parts for building workbenches, desks, and industrial fixtures will have a robust inventory of Kindorf channel available.
- Direct from the manufacturer – Buying directly from Unistrut, the leading manufacturer of Kindorf channel, provides maximum choice in sizes and finishes. Minimum order quantities may apply.
- Used surplus sellers – To save on costs, recycled Kindorf channel can be purchased from industrial salvage companies and online used equipment dealers. Condition varieshugely.
For small DIY projects, hardware store Kindorf is fine. But for larger commercial systems, an industrial supplier will offer more choice and consistently stocked inventory of channel, end caps, couplers, and compatible mounting hardware.
How to Install Kindorf Channel
Installing Kindorf channel to build your system requires just a few steps. Here is an overview of the basic process:
- Measure and cut channel – Cut pieces of channel to required lengths using a hacksaw or reciprocating saw.
- Position channel – Place channel along the desired mounting path, leveling and measuring as needed. Mark holes.
- Drill holes – At minimum, holes should be drilled at channel ends and every 36-48 inches along the length.
- Mount channel – Use bolts, screws, or other hardware to securely attach channel to the underlying surface.
- Finish ends – Cap ends or connect lengths of channel using couplings. End caps provide the cleanest look.
- Add accessories – Insert desired hooks, brackets, hangers into channel slots to hang equipment or components as intended.
- Tighten – Once accessories are positioned as required, tighten grub screws or boltstosecure in place within the channel.
The key is taking the time to measure and drill mounting holes accurately so the channel is laid out in an optimal straight line for your installation.
Kindorf Channel Dimensions
Kindorf is manufactured in a range of widths and depths to suit different load capacities and installation needs:
- Channel widths – Common options include 1-5/8″, 2″, 2-5/8″, 3-1/2″, 4″, 5″, 6″, 8″, 10″, and 12″.
- Channel depths – Usual depths are 1-5/8″, 2″, and 2-5/8″. Deeper 3-1/2″ is also produced.
- Channel lengths – Standard lengths are 12′ and 20′. But custom cutting is common.
- Wall thickness – The steel channel has a wall thickness ranging from 14 gauge up to 3/16″. Thicker 10 gauge is used for heavy duty versions.
The 2″ x 1-5/8″ size is popular for general purpose use. But confirm channel dimensions match your accessories and hardware before purchasing.
Kindorf Channel Materials
The majority of Kindorf channel is made from painted carbon steel for strength and durability. But stainless steel, aluminum, and specialty high temperature or chemical resistant composites are also available:
- Carbon steel – Most economical option. Painted finish resists corrosion. Typically 14 to 10 gauge thickness.
- Stainless steel – For corrosive environments. More expensive but offers maximum durability. Brushed finish.
- Aluminum – Lightweight for easier handling. Prone to damage if mishandled. Mill finish.
- Composites – Withstand exposure to high heat or caustic chemicals. Costly but ideal for demanding applications.
Consider both operating conditions and budget when choosing the ideal material. Heavier duty 10 or 12 gauge carbon steel is a good compromise for demanding commercial settings.
Cutting Kindorf Channel to Size
Cutting Kindorf channel to your required run lengths is simple with the right tools:
- Hacksaw – A standard hacksaw with 32 TPI metal blade can cut thinner gauge channel. Slow but inexpensive.
- Portable band saw – Handheld or tabletop band saws quickly cut through channel up to 1/8″ thick.
- Chop saw – Abrasive cut-off saws make the quickest, cleanest cuts through heavy walled channel.
- Angle grinder – Fitted with a thin cutting disc, an angle grinder slices through channel rapidly. High sparks.
- Jigsaw – Using a fine-toothed metal blade, a jigsaw can navigate tight spaces other saws can’t.
- Shears – Manual or electric shears cut easily through light gauge channel. Avoid twisting the channel during cutting.
For occasional use, a hacksaw is fine. But for frequent cutting, invest in a power saw to make the process faster and easier.
Kindorf Channel Accessories
One of the big benefits of Kindorf channel is the wide range of matching accessories and hardwareavailable to customize your installation:
- Brackets – Vertical, horizontal, hanging, and specialty brackets securely position components.
- Hooks – Peg hooks, bicycle hooks, and custom hooks suspend items from channel.
- Shelves – Flat, slanted, and heavy duty shelves are mounted via channel brackets.
- End caps – Caps create clean finished channel ends versus rough cut edges.
- Couplers – Join two sections of channel together with straight, offset, or elbow couplers.
- Hangers – Rod and pipe hangers attach to channel to suspend electrical conduit and more.
- Trolleys – Roller trolleys inserted in channel allow equipment to glide along the length.
The accessories simply slide into the channel and tighten via grub screws, wing nuts, or bolts for adjustable installation.
Connecting Multiple Kindorf Channels
Extended Kindorf installations often require joining multiple channels together in a secure, aligned manner. There are two recommended methods:
- Couplers – Straight couplers insert into opposing ends of channel to connect along the same axis. Offset or elbow couplers join channels at 90 degree angles.
- Overlapping – Cut channel ends at 45 degree angles.Overlap the ends and bolt together through both walls for a rigid connection.
For the strongest connection with minimal play, couplers are preferred. But overlapping cut channel ends also creates a solid joint for linear and 90 degree connections.
Is Kindorf Channel Suitable for Outdoor Use?
Kindorf channel can be used in outdoor settings if the correct type is selected:
- Indoor rating – Standard carbon steel channel is not corrosion resistant and will rust outside.
- Weather resistant – Special outdoor channel has a galvanized zinc G90 coating for all weather durability.
- Marine grade – For ocean and extreme environments, marine grade 316 stainlesssteel offers maximum corrosion and UV resistance.
- Sealing – Caulking channel ends and joints helps limit water intrusion into the slot area.
With weather resistant or marine grade channel and accessories, Kindorf provides a highly durable outdoor mounting system lasting decades with minimal maintenance.
Load Capacities of Kindorf Channel
Kindorf is produced in different gauge thicknesses to support equipment of varying weights:
- Light duty – 1-5/8″ 14 gauge channel holds up to 115 lbs per linear foot.
- Medium duty – 1-5/8″ 12 gauge rated for 175 lbs per linear foot capacity.
- Heavy duty – 2″ x 1-5/8″ 10 gauge holds up to 590 lbs per linear foot.
- Extra heavy duty – 3-1/2″ x 2-1/2″ 7 gauge channel supports 1,740 lbs per foot.
Thicker wall channel and larger widths increase strength for heavier loads. Always leave a safety margin and avoid exceeding working load limits.
Mounting Equipment on Kindorf Channel
Kindorf makes mounting machinery, shelving, signs, and other equipment simple. Here are some tips:
- Select appropriate hangers or brackets for the item being mounted. This ensures a secure fit.
- Position hangers in channel and tighten grub screws to lock in place before loading. Tightening prevents slipping.
- Use flat washers under all mounting bracket nuts and bolts to distribute load.
- When possible, mount heavier items near the bottom of the channel for greatest stability.
- Use self-locking hardware like flanged lock nuts to prevent loosening of components.
- Spread loads over multiple hangers or mounting points for equipment exceeding 100 lbs.
Follow manufacturer rated capacities, evenly distributing weight, and Kindorf channel will support equipment reliably for years.
Kindorf Channel Finishes
The standard finish for carbon steel Kindorf channel is painted gray enamel, but additional options are available:
- Yellow enamel – High visibility yellow coloring for safety awareness.
- Galvanized – Molten zinc coating for improved corrosion and chip resistance.
- Epoxy powder coated – Durable colored powder coat in red, green, orange, black, or custom colors.
- Unfinished – Raw mill finish channel saves cost but is prone to rusting.
- Stainless steel – Brushed stainless channel maintains its handsome appearance for decades.
Consider finish visibility, ability to resist corrosion, and appearance when selecting channel coating. Matching accessories are available in many finishes.
Securing Kindorf Channel to a Wall
Properly securing Kindorf channel to walls is crucial for safety. Here are recommended techniques:
- Through bolting – Drill bolts straight through the wall into channel backs and secure with washers and nuts.
- Expansion anchors – Hammer in anchors flush with the wall, then fasten channel using machine screws.
- Concrete screws – Pre-drill holes and drive hex head lag screws into concrete with an impact driver.
- Welding – Channel can be welded directly to steel framing or surfaces for the strongest bond.
- Adhesives – Construction adhesives help fill gaps uneven surfaces but don’t sole rely on them.
For brick, masonry, or drywall, use toggle bolts inserted through pre-drilled channel holes. Avoid nails which loosen over time.
Using Kindorf Channel for Electrical
The internal slot on Kindorf makes it ideal for running electrical wiring:
- Pre-drilled – Many sizes come with factory drilled wiring holes spaced every few feet.
- Flexible – Wiring can be laid at any point along the channel, then secured with cord clamps.
- Enclosed – Channel protects and hides wiring from view and damage.
- Grounded – Metal channel grounds all wiring eliminating the need for ground wires.
- Capped ends – Closures prevent wire ends from slipping out of open channel ends.
Always use appropriate gauge cabling and avoid exceeding fill capacity. Kindorf removes the hassle of surface mounted conduit and wiring.
Benefits of Using Kindorf Channel
Some key benefits of using Kindorf channel include:
- Strength – Thick steel construction securely supports heavy equipment.
- Modularity – Components adjust in channel slots to reconfigure installations.
- Flexibility – Curved, bent, and twisted channels are available for unique layouts.
- Capacity – Multiple accessories and wires can mount in a single channel.
- Enclosure – Channel protects wires and equipment from damage.
- Aesthetics – Straight runs and clean lines provide an attractive appearance.
- Simplicity – Easy to install using common hand and power tools.
- Cost effective – More affordable than custom metal fabrication in many cases.
With its adjustability, hiding of wires, and rugged support, Kindorf solves many mounting challenges where flexibility and strength are needed.
Choosing the Right Kindorf Channel
Keep these tips in mind when selecting the best Kindorf channel, brackets, and accessories for your project:
- Carefully consider the total load your setup must support. This determines necessary channel width and gauge.
- Standard 2″ x 1-5/8″ depth suits most applications. Go deeper only if needed.
- Select matching channel fittings from the same manufacturer for guaranteed compatibility.
- For heavy items, choose wide channel and spread loads over multiple mounting points.
- In corrosive environments, use stainless steel or outdoor rated finishes.
- Review costs of channel, hardware, shipping, and tax when comparing supplier options.
Take time to plan required equipment layouts on paper before purchasing. This allows buying the optimal size components for your particular installation.
Assembling Kindorf Channel Systems
When designing and assembling Kindorf channel structures:
- Draw up a detailed plan view diagram outlining the full channel layout and hardware.
- Double check models and dimensions of all attachments and accessories before purchasing.
- Dry fit pieces together before final drilling and assembly to ensure proper fitting.
- Follow manufacturer instructions for correctly mounting and securing channel to surfaces.
- Carefully level and align channels using shims if the mounting surface is uneven.
- Use care when cutting channel to appropriate lengths using power saws.
- Wear safety glasses and gloves when cutting channel and handling cuts with sharp edges.
- Keep the site clean and organized to avoid losing small fittings and hardware.
With good planning and care taken during installation, Kindorf channel provides years of durable trouble-free performance.
Kindorf Channel Durability
Kindorf channel made from thick, high-grade American steel is extremely durable, outlasting wood or plastic alternatives:
- Impact resistant – Channel retains its shape even when bumped or hit.
- Load rated – Channel safely supports weight capacities ranging from 115 to 1,740 lbs per linear foot.
- Corrosion resistant – Enamel and galvanized coatings prevent rusting for decades.
- Heat tolerant – Channels function in temperatures up to 130 degrees Fahrenheit.
- Chemical resistant – Stainless steel withstands caustic cleaners and acids.
- Abrasion resistant – Finishes resist scratching during equipment installation.
- Fireproof – Steel construction won’t fuel flames or release toxic fumes.
With proper installation and maintenance, Kindorf channel provides a lifetime of reliable structural performance.
Common Applications of Kindorf Channel
Beyond basic mounting and cable routing, creative uses of Kindorf channel include:
- Building modular workstations on assembly lines using channel frame components.
- Constructing cleanroom wall panels to mount utilities and filters within channel.
- Forming outside equipment enclosures by framing walls with channel and clear polycarbonate.
- Using channel as handrails and guardrails for steps, platforms, and walkways.
- Building horizontal bike racks by suspending hooks from vertical channel.
- Supporting solar panel arrays using vertical channel mounts and lateral tracks.
- Creating conveyor frames with channel spanning gaps to support lines of rollers.
- Constructing temporary room dividers using channel as floor to ceiling posts.
The modular nature of Kindorf makes it ideal for building industrial fixtures, safety barriers, and structural frames.
Working Safely with Kindorf Channel
Kindorf channel involves handling heavy materials at height, requiring safety precautions:
- Wear steel toe boots to protect feet from dropped channel and hardware.
- Don safety glasses when cutting channel or drilling holes to prevent eye injuries.
- Use leather gloves when carrying or handling channel to avoid skin cuts.
- Bring channel to ground level for cutting whenever possible for best control.
- Prevent channel tipping during storage by stacking flat and bracing upright pieces.
- Avoid electrical lines when working at height around overhead channel.
- Utilize lifting equipment like cranes, hoists, and helpers to maneuver heavy channel.
- Pre-drill holes for mounting hardware to prevent blows from hammering drill bits.
Staying alert and following safe working practices ensures Kindorf systems are installed incident free.
In Summary
With its modular design, rugged durability, and capacity to securely mount equipment, Kindorf channel is the ideal solution for industrial and commercial mounting projects. This guide covers the key factors – from proper installation steps to matching components and safety considerations – to consider when specifying and purchasing Kindorf. Whether building retail displays, cable runs, equipment racks, or conveyor frames, understanding the complete end-to-end process for working with Kindorf channel ensures your system meets the needs and lasts for years to come.